Tag Archive | costume

Easy DIY Margarita or Cocktail Costume

With a few basic sewing skills, you too can become one with your favorite cocktail!

Supplies you will need:
Fabric – Green/yellow or other color that will represent your drink of choice (I used a fabric with a bit of stretch, but any fabric will do the trick.)
White fabric with “salt” design or you can use glitter on the fabric instead
White thread
Elastic
Empty paper towel roll
White and red paper
2 Printed pictures of a lime (I printed one on 8.5×11 paper)
Headband
File folder

To create the dress, simply wrap the colored fabric around your body and determine the length you want it to be – Mid-thigh usually looks best. Mark the length and cut off the excess length.

Once the fabric is the length you want, you can hem the bottom of the dress if you are looking for a clean look or just leave the edge raw which is what I did.

Next, wrap it around your body again and pin it so that it is tight enough on your body to take a “glass” shape. Remove the fabric and sew along the pins. Cut off excess fabric.

1027170713.jpg

Ignore the pencil marks (I used scrap fabric) and crazy stitching. I’m sure you’ll do a better job!

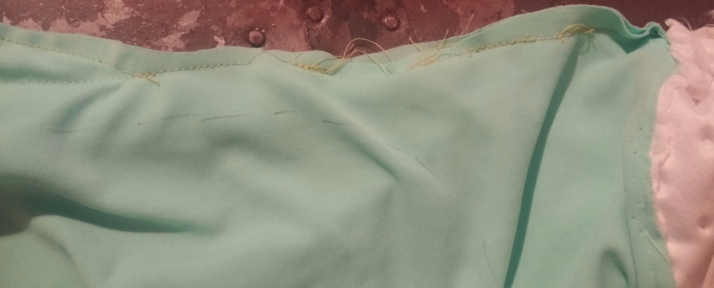
Cut a strip of white fabric and elastic to match the circumference of your upper chest (above the boobs). Sew the elastic to the back of the white fabric using your elastic stitch and then sew the fabric to the top of the dress using a straight stitch Sew it right sides together so that your seam ends up hidden on the inside of the dress.

Bam! You now have the glass of your drink. 1027170717

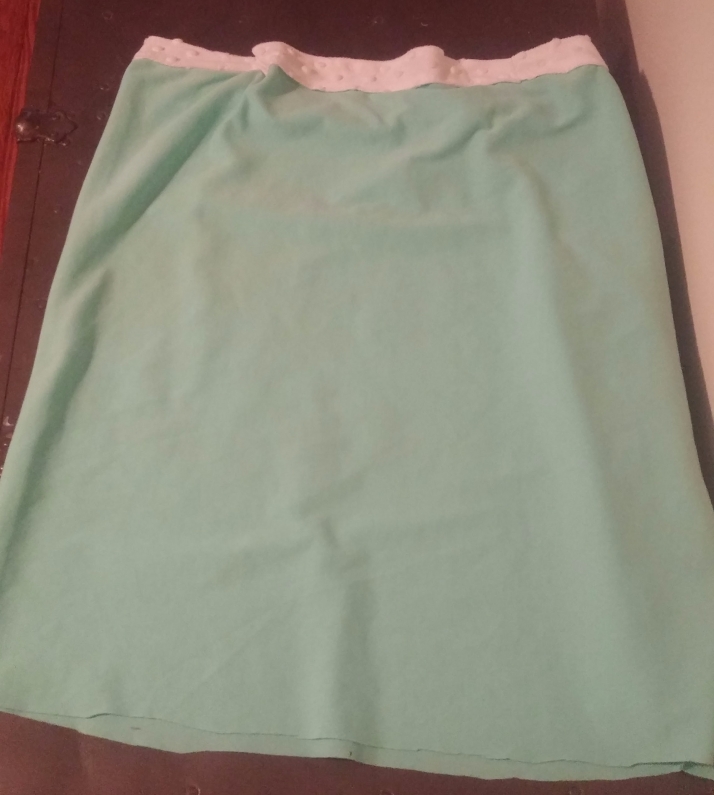
To make the straw, you simply hold an empty paper towel roll up to your chest and see how tall you want the straw to be. Make sure to leave some extra space for the straw to attach to the dress. Cut off excess.

Cut strips out of the white and red paper and simply glue it in a spiral onto the roll. Be sure to leave all the seams on only one side of the roll so that you can make that side the back of your straw and any imperfections will be hidden.

To attach the straw to the dress, just stick it in at the top and secure it with a safety pin.

The last step is making the lime – you can’t have a margarita without a lime!

Find a graphic of a lime on the Internet and print it to the size you want. Print two copies and then cut them out. Cut the same shape out of your file folder.

Glue the lime pictures to the front and back of the file folder and then attach it to your headband. How you attach it will matter on what type of headband you are using. Mine allowed me to hand sew it on.

1027170718

That’s it…..now you’re a margarita! Grab your tacos and go have some fun!

margarita

Sorry for the bad pic. This is the only one I have!

DIY Taco Costume for Dogs

Turning your dog into a taco is easier than you think. There are several steps, but it can come together pretty quickly if you have basic sewing machine skills.

Supplies you will need:
Large yellow felt
Small pieces of red, orange, black, etc. felt
Green fabric
Brown fabric
Stuffing / fill
Elastic or velcro

I started off by measuring the length of my dog from neck to tail,  belly to back and across his back the wide way (straight lines).

Next use an appropriate-sized bowl to trace a half circle onto the yellow felt. Cut it out and then make sure the sizing is right for your dog by holding it against his body. If all is good, cut out a second piece.

taco cuts

Next use your measurements of your dog’s back length and width to create a template for the “meat”. I made mine a bit wavy so that it wouldn’t look like a brown brick. 🙂  Once you have the template done, hold it against your dog to ensure it is the right size. Using the template, cut out two pieces of brown fabric and sew them right sides together leaving a small opening to flip it right-side out and also to stuff it with the filling.

meat

Once the meat is filled with stuffing, go ahead and hand-sew it closed as well.

To make the lettuce, cut out a strip of green fabric twice the length of your taco. Ruffle pin the fabric to the inside top of the taco and sew it on using a simple straight stitch. Be sure to use a yellow thread so that it isn’t visible on the outside of the taco.

1008171045

Ignore the messed up stitching. I redid it after I took the photo 🙂

You should now hand stitch the meat onto the inside of the taco shell right by the bottom of the lettuce.

The next part is your preference. I was feeling lazy and didn’t want to make straps and velcro to secure it to my dogs so I just sewed on some elastic under his chin, front legs and back legs. Alternatively, you could sew on two pieces of fabric with velcro in each area and secure it that way. Totally your preference.

You’re almost done! Now all you have to do is cut up some felt pieces for the filling. You could use yellow and orange for cheese, red for tomatoes, etc. You then just hot glue these pieces to the top of the meat.

mimi taco

Mimi got a little tipsy and knocked her taco to the side

Viola! Your dog is now a taco. Don’t let him too close to the cat……he may get eaten!

billy taco

PS Later I added a whole and a harness clip extension to the middle of the costume so that I could walk the dogs on leash.

PPS I paired this with a margarita costume for myself. Tutorial to follow!

DIY Gumball Machine Costume for Pregnant Women

Making a gumball machine costume for a pregnant woman is super easy.

Supplies you will need:
White shirt
Red beret
Short red A-line skirt
Pom-poms – at least 1 inch (200 – 400 depending on size of belly)
Hot glue
Tin foil
File folder or other thin cardboard
Black construction paper

To start, you’ll need to find a pregnant woman and have her throw on the white shirt. Using a pencil lightly trace her belly, so you’ll know where to glue the pom-poms. You’ll want to be able to erase this line later on or cover it with the pom-poms.

shirt

Once you have the circle, lay the shirt flat on a table. Arrange your pom-poms in the circle to make sure you have enough to cover the surface area. They should be close together with no shirt showing through. If you don’t have enough to cover the whole area, you can glue on some construction paper first to help hide the gaps. I only used 200 1 inch pom-poms but should have used at least 100 more.

const


Once you have determined that you have enough pom-poms, go ahead and remove them and fire up that hot glue gun. Apply the glue to small portions of the shirt and stick a few pom-poms on at a time. Don’t try to rush and apply too much glue at once because it will just dry before you can attach the pom-poms.

Be sure to spread your colors around so you don’t have too many color clusters.

shirt t

Once that’s done, you’ll want to cut out a 6 inch by 8 inch rectangle from your file folder and wrap it in tin foil.

1015171944

Using black construction paper, you can create the dial by drawing a 1 inch circle (or tracing it like I did because I have no artistic ability whatsoever) and then simply adding a rectangle on either side.

For the 25 cent section, I simply cut out a 25 from the black construction paper and glued it onto a white square. Do the same for the black square. Easy peasy!

To attach the cardboard to the skirt, I simply fastened it with two safety pins at the top as I did not want to ruin the super cute skirt. 🙂

Now go ahead and throw on the shirt and skirt and top it off with the beret.

blog pic

Bam! You are now a gumball machine!